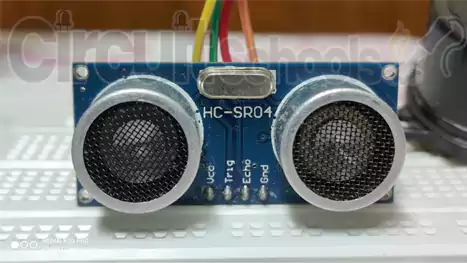

In this Project, we are going to build a car parking assistant system with the help of HC-SR04 ultrasonic distance senor and interfacing it with Arduino to calculate the distance between the sensor and obstacle and perform instructions according to the Program code.
| Product Name | Quantity | | |
|---|---|---|---|
| HC-SR04 ultrasonic distance sensor | 1 | https://amzn.to/3CdXXAi | https://amzn.to/3sVUiUF |
| Arduino Uno Microcontroller | 1 | https://amzn.to/3H4cKxZ | https://amzn.to/3638aTS |
| Buzzer for sound | 1 | https://amzn.to/3vAHi8L | https://amzn.to/3hQBwaP |
| Few Connecting Wires | https://amzn.to/3H2BV4e | https://amzn.to/3J0WVu2 |
In many of our projects, we need to sense our environment, to know if there is an obstacle in front of us and to know the distance between sensor and obstacle, HC-SR04 ultrasonic distance sensor helps us to solve those problems.
 ultrasonic distance sensor pinout" width="467" height="263" />
The HC-SR04 ultrasonic sensor is a low cost distance sensor, widely used in robotics, it uses ultrasound transducers to detect objects.
When is sensor is powered on an ultrasonic sound wave(at higher wavelength, humans cannot hear) is emitted through one of its transducers, and waiting for the sound to bounce off at some present object, the echo is captured by the second transducer. The distance is proportional to the time it takes for the echo to arrive.

In Simple terms: The operation is very simple. The sensor sends an ultrasonic sound wave through the trigger or trigger, bounces off the object and the receiver or echo detects the wave. By measuring the time taken for the wave from emission till it gets back we can know the distance.
The distance is calculated with the below formula which we learnt at school
Velocity(v) = Distance(s)/time(t). ⇒ Distance(s)= Velocity(v) X time(t).As we know the speed of the sound in air is 343 meters per second(1234.8kmph) at 20°C, and we can measure the time between the emitter and receiver. By multiplying speed with time we can calculate the distance. Which can be done through program code and processed by microcontrollers. The speed increases or decreases 0.6 m/s per degree centigrade. We can be more accurate if we use a temperature sensor like the LM35 .
Connect all the above mentioned components according to the below schematic diagram.

As you can see from the above circuit diagram the ultrasonic sensor is powered from Arduino 5v and GND pins. TRIG pin from the sensor is connected to digital pin 8 pin of Arduino and ECHO pin of sensor is connected to digital pin 4 of Arduino. And finally the Piezo buzzer + wire is connected to digital pin 7 and – wire is connected to GND of Arduino.
If you are using Arduino NANO, ESP8266 or ESP32, you can just refer their pinout diagrams and connect the pins accordingly and change the pin numbers in the code.
Now its time to upload the code
After connecting all the components now connect the Arduino board to PC where Arduino IDE is installed. Copy the below program code and paste it in the Arduino Workspace. Select the correct board and port from the Tools menu and Hit upload button.
This program doesn’t need any library.
// Arduino parking sensor code www.circuitschools.com int buzPin = 7; //declare pin for Buzzer; int trigPin = 8; //declare pin for trigger pin of UltraSonic sensor; int echoPin = 4; //declare pin for echo pin of UltraSonic sensor; float speed = 0.0347; //declare speed of sound in air @ room temp; float dist; //declare variable for containing distance sensed; float pingTime; //declare variable for containing echo time; int buzNear = 20; //declare buzzing time for very close proximity; int buzHigh = 50; //declare buzzing time for close proximity; int buzMid =130; //declare buzzing time for mid proximity; int buzFar = 600; //declare buzzing time for far off object; int delayFar = 260; void setup() < Serial.begin(9600); pinMode(buzPin,OUTPUT); //set buzzer & trigger pin as outpin; pinMode(trigPin,OUTPUT); pinMode(echoPin,INPUT); //set echo pin as input; >void loop() < digitalWrite(trigPin,LOW); delayMicroseconds(20); digitalWrite(trigPin,HIGH); delayMicroseconds(10); digitalWrite(trigPin,LOW); //creating a pulse for sensing distance; pingTime = pulseIn(echoPin,HIGH); //read the echoTime, &hence the distance; dist = (speed*pingTime*0.5); Serial.print("Distance: "); Serial.println(dist); if(dist<=10.0)< digitalWrite(buzPin,HIGH); //simple conditional statements changing frequency based upon the distance sensed delay(20); digitalWrite(buzPin,LOW); delay(20); >else if(dist10.0) < digitalWrite(buzPin,HIGH); delay(buzHigh); digitalWrite(buzPin,LOW); delay(buzHigh); >else if((dist>30.0) && (dist <60.0)) < digitalWrite(buzPin,HIGH); delay(buzMid); digitalWrite(buzPin,LOW); delay(buzMid); >else if(dist>=60.0 && dist <120.0) < digitalWrite(buzPin,HIGH); delay(buzFar); digitalWrite(buzPin,LOW); delay(delayFar); >>
After uploading the code you can check the serial monitor for distance and also can check directly with the sensor by placing any object before the sensor and moving near and far from the sensor. As the distance decreases you can hear the tone from the buzzer, as we added near, mid and far tones effects its easy to understand the distance.
You can attach this device to your car or garage wall where you park your car for safely. If you attach it to car put the buzzer inside the car with long wires. If you are using it on garage wall add a bigger buzzer and you can also add addressable led lights to indicate the safer and danger limits.
You can also use this for trailers as they are far away from the main vehicle.
Note: If you are thinking to build car parking sensor with webserver or any cloud servers better avoid it, because this device needs to be fast in indicating, any network has some amount of delay which is bad in this case, which results in damage of our vehicle.